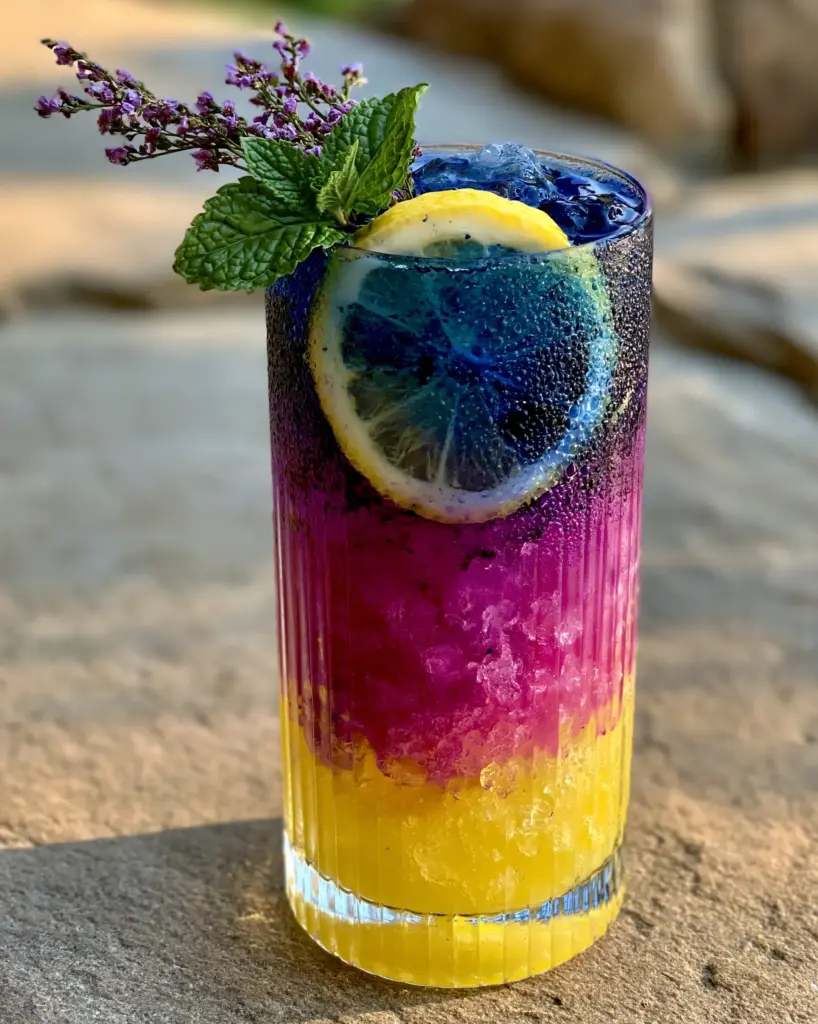
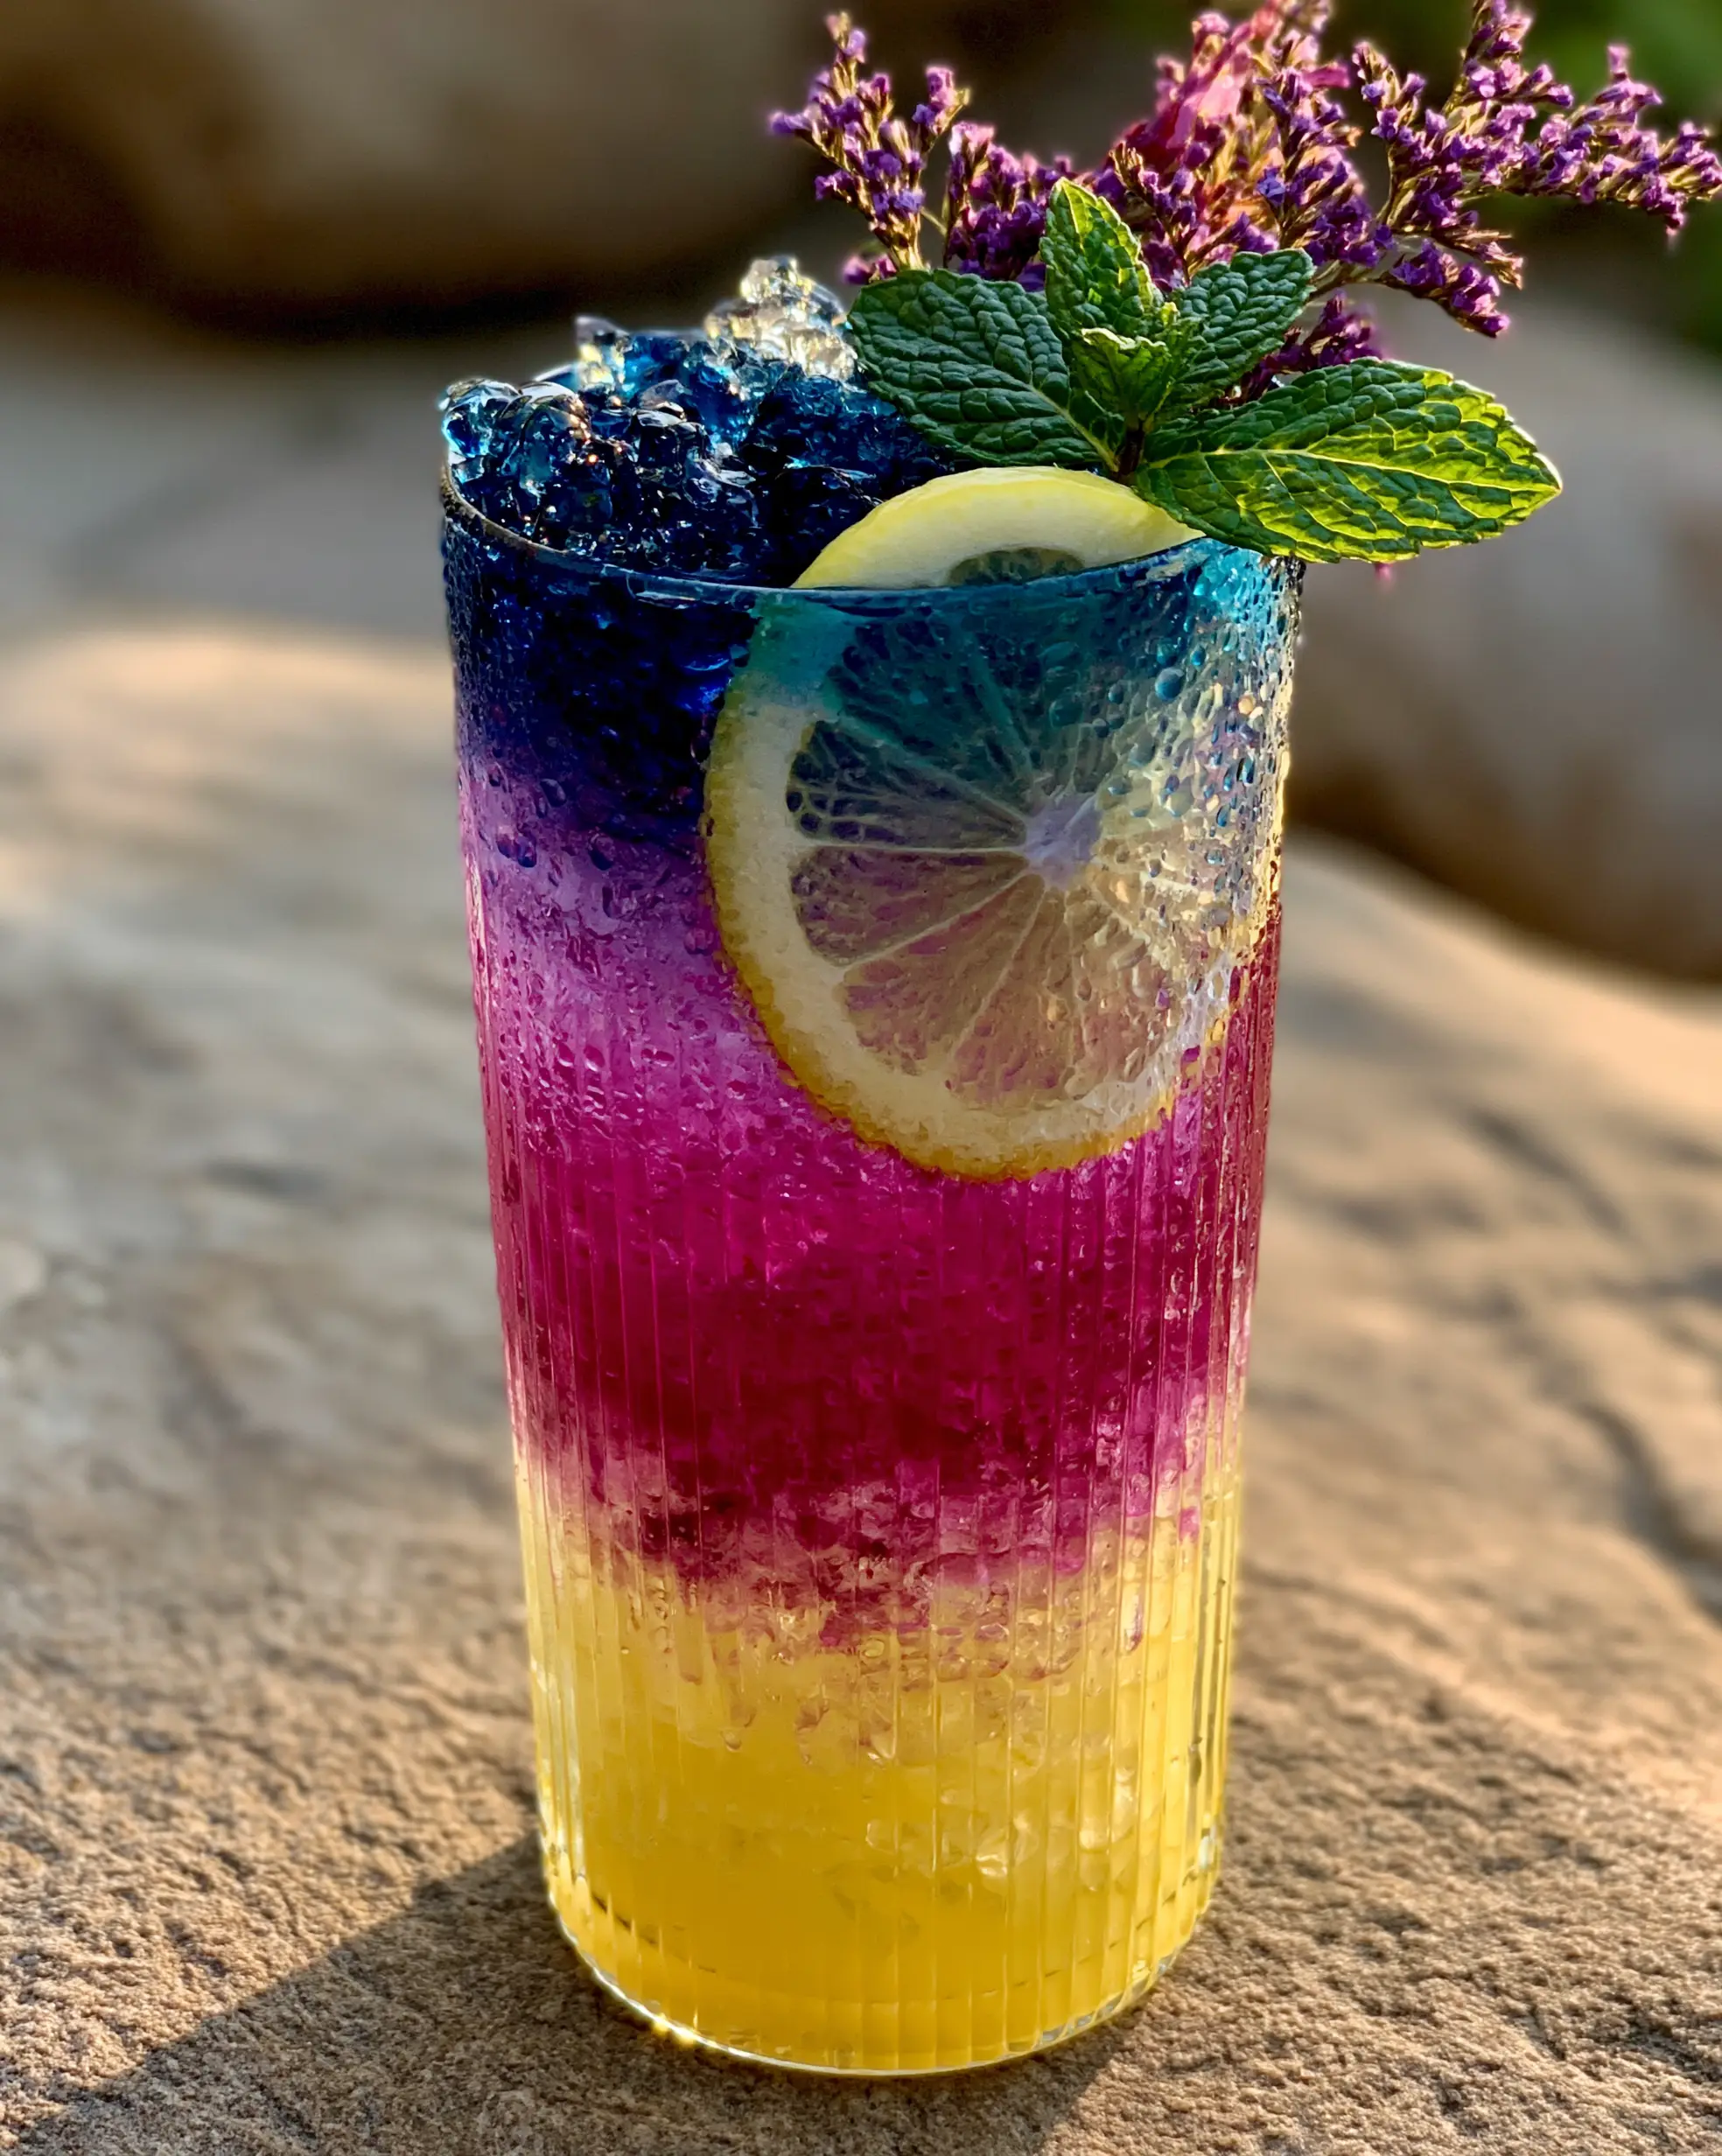
There is something inherently magical about a drink that looks like a captured sunset inside a glass. This Butterfly Pea Lemonade isn’t just a beverage; it is a sensory experience that transitions from a deep royal blue to a brilliant magenta right before your eyes. By playing with the science of pH levels and liquid density, we can create a stunning three-tiered masterpiece that tastes as vibrant as it looks.
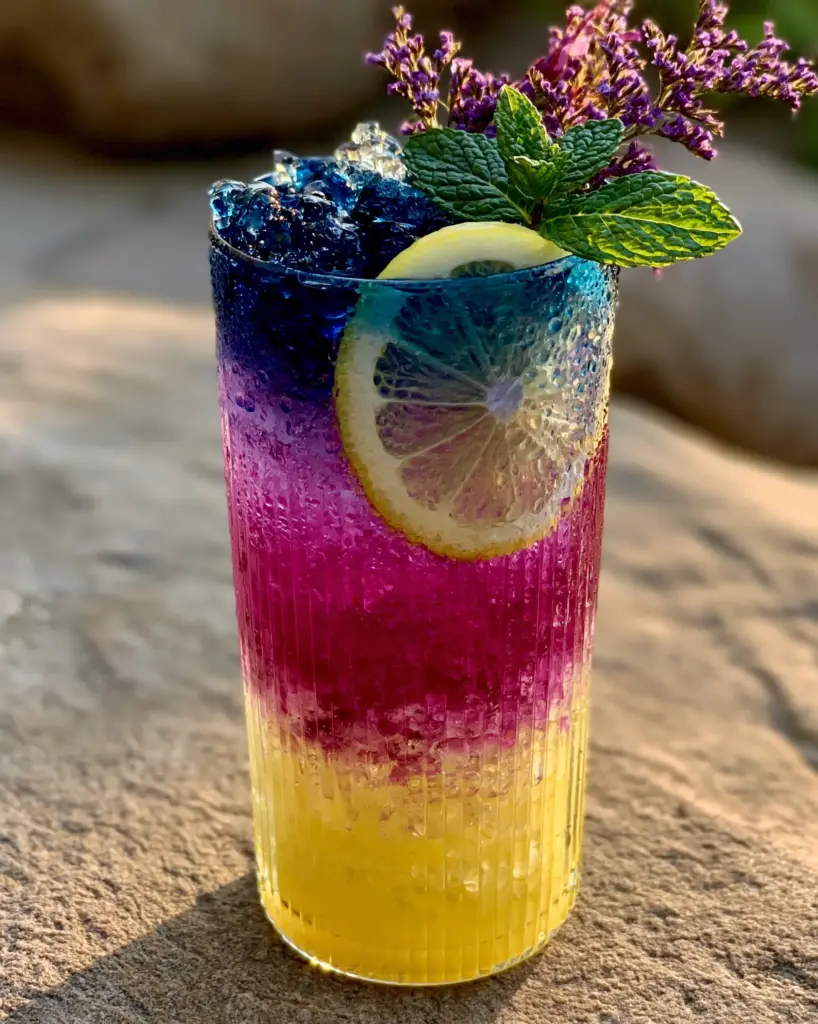
When you hold a tall ribbed glass filled with this concoction, the first thing you notice is the glistening condensation forming on the exterior, promising a cold, crisp escape. The visual recipe blueprint for this drink requires a specific architectural approach: a heavy, vibrant yellow base, a reactive magenta middle, and a pure cerulean crown. Whether you are hosting a summer garden party or simply want to elevate your afternoon hydration, this recipe delivers professional-grade aesthetics with simple, natural ingredients.
Mastering the art of the pour is the key to achieving those distinct, crisp lines seen in high-end mixology. We aren’t just mixing juice; we are layering flavors and colors using the natural pigments of the Clitoria ternatea flower. Let’s dive into the botanical science and culinary techniques required to build this show-stopping drink.
Why This Layered Botanical Lemonade Stands Out
- Visual Chemistry: Watch the natural anthocyanins in the butterfly pea flowers react to the citric acid in the lemon, shifting the liquid from royal blue to bright magenta-purple.
- Textural Contrast: The use of fine crushed ice creates a frost-like structure that helps suspend the layers and keeps the garnishes, like fresh mint and lemon wheels, perfectly in place.
- Balanced Flavor Profile: You get the tart punch of fresh lemon juice tempered by a velvety simple syrup, finished with the earthy, green tea-like notes of the butterfly pea blossoms.
- Photogenic Elegance: Adorned with delicate dried purple blossoms and fresh green mint, this drink is designed to be the centerpiece of any table setting.
The Essential Components for a Vibrant Three-Tiered Drink
To achieve the exact visual described in our blueprint, we need to focus on density. The bottom layer must be the heaviest (highest sugar content), while the top layer must be the lightest (pure water infusion). This ensures the colors remain distinct rather than bleeding into a muddy brown.
The Concentrated Lemon Base
1 cup (240ml) Freshly Squeezed Lemon Juice: You need the high acidity of fresh lemons to trigger the color change. This forms the vibrant yellow foundation of your glass.
3/4 cup (150g) Granulated Sugar: We will dissolve this into the juice to create a thick, heavy syrup. The sugar increases the density of the bottom layer, preventing it from mixing prematurely with the tea.
The Botanical Infusion
2 tbsp (approx. 15-20 flowers) Dried Butterfly Pea Flowers: These provide the intense royal blue pigment. Using whole dried flowers ensures a cleaner, more earthy flavor than powdered alternatives.
1 cup (240ml) Hot Water (90°C/195°F): We use near-boiling water to extract the maximum color and antioxidants from the petals quickly.
Foundational Textures and Garnishes
2-3 cups (approx. 400g) Crushed Ice: Crushed ice is superior to cubes here because it acts as a filter, slowing down the liquid as you pour to maintain the layers. It also allows you to press a lemon wheel firmly against the glass interior.
Fresh Lemon Wheels: A thin slice of lemon, pressed inside the ribbed glass, adds a professional visual touch and a hint of essential oil aroma.
Fresh Mint Sprigs: The aromatic oils in the mint provide a cooling scent that hits the nose before the first sip.
Extra Dried Blossoms: A few delicate dried purple blossoms scattered on the top layer provide a rustic, organic finish.
Professional Tools for Botanical Mixology
You don’t need a full bar setup, but a few specific tools will help you replicate the “handheld smartphone photo” aesthetic perfectly. First, a tall ribbed glass is essential for the way it catches the light and creates shadows within the layers.
You will also need a small saucepan to create the lemon syrup and a fine-mesh strainer to remove the spent butterfly pea flowers from the tea. A long-handled bar spoon is the secret weapon for the “slow pour” technique, which allows the blue tea to sit gently on top of the magenta middle layer.
Step-by-Step Architecture of the Butterfly Pea Lemonade
Step 1: Extracting the Royal Blue Pigment
Begin by placing your dried butterfly pea flowers in a heat-proof glass or ceramic bowl. Pour 1 cup (240ml) of hot water over the blossoms and let them steep for 5 to 7 minutes. You are looking for the water to turn an opaque, deep royal blue; if it looks translucent, let it steep longer.
Once the desired intensity is reached, strain the liquid into a small pitcher and discard the flowers. Set this aside to cool completely. For the best layering results, the tea should be at room temperature or chilled, as heat will cause the layers to mix through convection.
Step 2: Crafting the Heavy Yellow Foundation
While the tea cools, combine your fresh lemon juice and sugar in a small saucepan over low heat. Stir constantly just until the sugar has fully dissolved into the juice, creating a vibrant yellow lemon syrup. Do not let it boil, as you want to preserve the bright, fresh flavor of the citrus.
If you prefer a more complex sweetness, you could use the syrup base from a honey lemon fizz to add floral depth. Once dissolved, remove from heat and chill. This thick syrup will be the “anchor” at the bottom of your ribbed glass.
Step 3: Preparing the Glassware and Ice
Take your tall ribbed glass and press a fresh lemon wheel against the inside wall. The ribs of the glass will help hold it in place. Fill the glass to the very brim with crushed ice. The ice should be packed relatively tightly to act as a stabilizer for the liquid layers.
This is the stage where you ensure the “glistening condensation” will form later by using very cold ice straight from the freezer. If you’re serving this alongside crispy appetizers, the temperature contrast is incredibly refreshing.
Step 4: The Precision Layering Process
Slowly pour the chilled yellow lemon syrup over the ice until the glass is one-third full. This is your base layer. Next, we create the magenta middle. Take about half of your blue tea and mix it with a small amount of lemon juice in a separate cup until it turns bright magenta-purple. Carefully pour this over the back of a spoon into the glass to create the second layer.
Finally, take the remaining pure royal blue tea. Place a bar spoon just above the magenta layer and slowly drizzle the blue tea over the back of the spoon. Because the tea has no sugar, it is lighter than the lemon layers below and will float perfectly on top, completing the tri-color gradient.
Step 5: The Final Botanical Touches
Nestle a vibrant sprig of fresh mint into the top of the crushed ice. The green provides a stunning color contrast to the blue tea. Scatter a few whole dried butterfly pea flowers onto the surface of the ice for an elegant, artisanal finish. Serve immediately while the layers are distinct and the glass is frosty.
Expert Tips for a Flawless Gradient
- Temperature Control: Always ensure your liquids are chilled before layering. Warm liquids are less dense and more prone to mixing, which will ruin the crisp lines between the blue and magenta.
- The Spoon Technique: Never pour the liquid directly into the center of the glass. The force will break the surface tension of the layer below. Always use the back of a spoon to diffuse the flow.
- Sugar is Structural: If you try to make a sugar-free version, the layers will bleed almost instantly. The sugar in the bottom layer is what provides the physical weight necessary to support the tea on top.
- Ice Height: Ensure the ice goes all the way to the top. The ice acts like a “staircase” for the liquid, helping it settle gently into place.
What to Serve with Your Butterfly Pea Lemonade
This drink is light, floral, and acidic, making it a perfect partner for savory or fatty dishes. For a light lunch, try pairing it with a traditional Greek salad where the feta and olives complement the citrus notes. If you are looking for something heartier, the refreshing nature of the lemonade cuts through the richness of garlic butter steak bites beautifully.
For a complete garden-themed spread, consider serving it alongside roasted zucchini dishes or a fresh Mexican street corn salad. The botanical aesthetic of the drink naturally pairs well with herb-forward recipes and fresh produce.
Storage and Make-Ahead Instructions
While the assembled Butterfly Pea Lemonade must be enjoyed immediately to appreciate the layers, you can prep the components in advance. The butterfly pea tea can be brewed and stored in an airtight container in the refrigerator for up to 3 days. Similarly, the lemon simple syrup can be made a week in advance.
Do not attempt to freeze the assembled drink, as the expansion of the water will mix the colors. However, you can freeze the blue tea into ice cubes. Adding these blue cubes to a standard lemonade will create a slow-release color-change effect as they melt!
Frequently Asked Questions
Achieving the layered look without sugar is difficult because the layers depend on density. You can try using a thick keto-friendly syrup, but traditional liquid stevia or erythritol may not provide the weight needed to keep the layers separate.
Yes, it has been used for centuries in Southeast Asian cuisine and is known for being high in antioxidants. However, as with any botanical, consume it in moderation.
Butterfly pea flower tea has a very mild, earthy flavor similar to a light green tea or chamomile. Its primary use in this lemonade is for its intense natural pigment rather than a strong flavor profile.
You can find dried whole butterfly pea flowers at specialty tea shops, Asian grocery stores, or through reputable online botanical retailers. Look for ‘Clitoria ternatea’ on the label.
If the layers mixed instantly, it is likely because the lemon juice (acid) came into contact with the blue tea (alkaline) too quickly. This happens if the liquids aren’t chilled or if you don’t use enough sugar in the base layer to create density.
The Complete Butterfly Pea Lemonade Recipe
Butterfly Pea Lemonade: The Ultimate Color-Changing Layered Refreshment Guide
Ingredients
Equipment
Method
- Place 2 tbsp (15g) dried butterfly pea flowers in a bowl and pour 1 cup (240ml) hot water over them. Steep for 5-7 minutes until the water is a deep royal blue.
- Strain the tea through a fine-mesh sieve to remove blossoms. Allow the liquid to cool completely to room temperature.
- Combine 1 cup (240ml) lemon juice and 3/4 cup (150g) sugar in a saucepan. Heat gently until sugar dissolves into a vibrant yellow syrup, then chill.
- Press a lemon wheel inside a tall ribbed glass and fill with crushed ice to the top.
- Pour the yellow syrup into the bottom third. Mix a little blue tea with lemon juice to create a magenta middle layer and pour over a spoon. Finish by floating pure blue tea on top.
- Add a sprig of mint and a few dried blossoms on top. Serve once glistening condensation forms on the glass.
Notes
Use the back of a spoon when pouring the top layers to prevent the liquids from mixing.
Closing & Call to Action
Mastering the Butterfly Pea Lemonade is a rite of passage for any home cook looking to add a bit of “wow” factor to their repertoire. The combination of botanical beauty and refreshing citrus flavor is unmatched. If you enjoyed crafting this visual masterpiece, please leave a comment below and let us know how your layers turned out! Don’t forget to share your photos and pin this recipe to your favorite drinks board on Pinterest.